Due to Internet censorship in China (known as GFW, Great Firewall, 防火长城), many websites (e.g. Google, Twitter) are blocked, and some websites (e.g. GitHub) suffer connectivity issues. In China, the means to circumvent internet censorship is referred to as 翻墙 (means climbing over the wall).
In China, to freely access the Internet, a proxy is essential. Despite various commercial options available, they may not be suitable for everyone. Therefore, I have constructed a user-friendly and easy-to-maintain proxy system for my research group, as a part of my responsibilities as a system administrator.
Target
Easy to use. Team members only need some simple configurations.The proxy client should be able to automatically update configuration.
Stability.
Sufficient traffic, to download large datasets.
Low Latency, to provide good experience for web.
Low Cost.
Easy to maintain. Frequent maintenance is unacceptable, and only simple changes of the configuration are required for new function.
Concealment. The cat-and-mouse game between GFW and anti-censorship tools has been escalating. Ten years ago (2013), only an OpenVPN client was all your need to “Across the Great Wall and reach every corner in the world”. Now, you must use much more sophisticated solutions to prevent your “unusual” traffic from being detected by GFW. According to GFW Report, popular Shadowsocks (a proxy protocol which simply encrypt all traffic using pre-shared key) was detected and blocked, and the TLS-based proxy also encountered large-scale blocking in Oct 2022. The tools and protocols used must be concealed enough to allow the service to run for a long time.
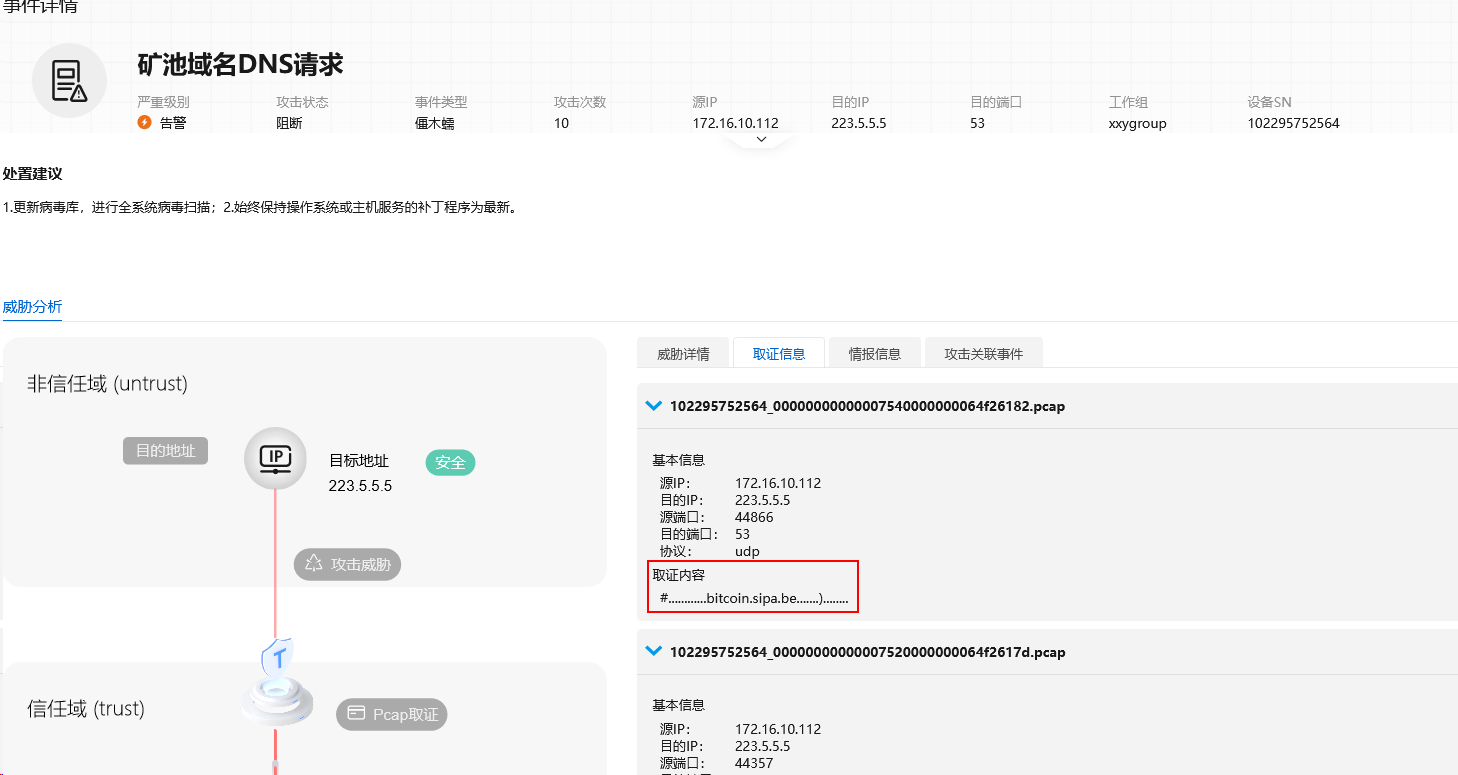
On October 30, 2023, I received a warning message from the data center administrator, informing me that the firewall detected mining traffic sending from the server managed by me.
The “mining traffic” was a bitcoin.sipa.be DNS request sent to 223.5.5.5.
Initially, I thought it was a simple task to find the virus process, just like my previous encounter with another mining virus. In that case, the hacker logged in the server by hacking a weak SSH password, gained root permission possibly by an privilege escalation vulnerability exploitation (it was a server running EOL Ubuntu 16.04). Then a cron job was set up to run a mining virus.
However, this time the situation was different. I couldn’t find any suspicious processes, and there was no unusual GPU usage. Since I didn’t deploy any monitoring programs to record historical processes and sockets, the investigation couldn’t get started.
On October 31, I received the same warning again. Each time when mining traffic is detected, the firewall will block the server’s outbound network. Loss of Internet will cause lots of troubles.
I suspected that someone may have suffered a supply chain attack, such as, downloading a Python package containing a virus, or cloning code from GitHub and running it without any check.
The immediate task is to identify who and which process was responsible.
Solution
While I can’t directly determine who or which process, I can block and log suspicious traffic for further investigation.
This job can be done by iptables:
1 2 3 4 5
# iptables -N LOGDROP # create a new chain # iptables -A LOGDROP -j LOG --log-uid # log info # iptables -A LOGDROP -j DROP # drop packet # iptables -I OUTPUT 1 -p udp -m string --string "bitcoin" --algo bm -j LOGDROP # match string "bitcoin" in udp packet
The --log-uid option can enable UID recording in /var/log/kern.log, for example:
All my answer files can be browsed in here, or you can download zipped file (5.9G).
Requirements
This is a test for candidates who wish to participate in the training class organized by VCB-Studio. Finish as many problems as you can, and then do the following things:
Pack your answers, result files, and necessary attachments into a zip/rar/7z file. Source files we provided and intermediate file in your encoding should not be packed in.
Register a Baidu Net Disk account (https://pan.baidu.com), upload the zipped file and create a sharing link. Whether you like it or not, Baidu Net Disk has been the most effective way to share files within our team since day one. Other sharing methods will NOT be considered.
Send the link via email to [email protected] before Beijing Time (UTC+8) Monday, 23 Jan 2023, 23:59:59. Late submissions will NOT be considered.
Prepare a QQ account. The follow-up training courses will be conducted in the QQ group.
You should independently complete the answers without any public discussion. Any form of plagiarism will NOT be tolerated.
This test has 5 questions. For question 2 and 3, you can choose ONE of them. Choosing both then we will pick one with higher points. The answers should be made in English.
Question1 (15pt)
Please describe yourself as who you are, where do you study, how do you come to know VCB-Studio and why are you interested in this project, etc. Please do not write more than 500 words, or approximately 1 page. (15pt)
Answers are hidden for privacy reasons.
Question2 (30pt)
Scanned pictures (or simply scans) are an important part of BDRips, which are often released as lossless PNG, TIFF format or lossy JPG format. Scans feature high resolution and large size. In the file Q2.7z, two sets of pictures have been provided for you. PNGs are the source scans, and WEBPs are transcoded from PNGs according to VCB-Studio Collation specifications. Your tasks are:
Summarize the format conversion rules of scans in VCB-Studio Collation specifications. (6pt)
Convert the sources to AVIF and JPEG-XL format, with sizes comparable to the WEBPs. (12pt)
Comment on the quality, encoding speed, and compatibility of AVIF and JPEG- XL, and why/why not you may recommend us switching to the new format as the upgrade for WEBP in 2023. (12pt)
You are free to utilize existing tools, but you need to describe clearly where you find the tool and how to use it.
(1) Format conversion rules of scans in VCB-Studio Collation specifications
Choosing a format with better image quality at the same size when ensuring compatibility.
(2) Converting test
See Q2/convert.py for my conversion code. Pillow, pillow_avif_plugin and jxlpy are used libraries. Pillow is the image processing library which I often use, it supports WEBP but not AVIF and JPEG-XL. So I find two Pillow plugins by Google to support AVIF and JPEG-XL.
PNG and WEBP Ref are given images, and WEBP Cus, AVIF, JPEG-XL are custom encoded images.
WEBP Custom is encoded by Pillow, which is backed by libwebp. Encoding speed is set to slowest(6), and quality is set to 90 to keep the same size with reference webp images.
AVIF is encoded by pillow-avif-plugin, which is backed by libavif. Encoding speed is set to slowest(0), and quality is set to 84 to get the comparable size with reference webp images.
JPEG-XL is encoded by jxlpy, which is backed by libjxl. Encoding speed is set to slowest(9), decoding speed is also slowest(0), and quality is set to 92 to get the comparable size with reference webp images.
The following table shows the result:
Image
PNG (size)
WEBP Ref (size)
WEBP Cus (size/time)
AVIF (size/time)
JPEG-XL (size/time)
01
26.97 MB
2.95 MB
2.95 MB / 3.36 s
2.77 MB / 37.77 s
2.56 MB / 32.00 s
02
26.25 MB
2.93 MB
2.94 MB / 3.27 s
2.71 MB / 34.87 s
2.48 MB / 33.07 s
03
3.60 MB
0.26 MB
0.26 MB / 0.37 s
0.28 MB / 11.48 s
0.28 MB / 5.12 s
04
21.78 MB
1.03 MB
1.03 MB / 2.06 s
1.32 MB / 29.56 s
1.39 MB / 32.25 s
05
2.65 MB
0.13 MB
0.13 MB / 0.24 s
0.15 MB / 9.29 s
0.18 MB / 4.11 s
06
2.66 MB
0.13 MB
0.13 MB / 0.25 s
0.15 MB / 9.39 s
0.16 MB / 3.81 s
07
24.38 MB
1.71 MB
1.71 MB / 2.25 s
1.67 MB / 27.78 s
1.68 MB / 35.59 s
08
55.52 MB
7.58 MB
7.58 MB / 26.48 s
7.93 MB / 83.44 s
6.36 MB / 72.90 s
09
44.39 MB
2.00 MB
2.00 MB / 3.53 s
1.99 MB / 59.79 s
2.47 MB / 71.73 s
10
41.59 MB
1.21 MB
1.21 MB / 3.11 s
1.16 MB / 59.99 s
1.70 MB / 63.65 s
PS: pillow-avif-plugin uses 8 threads to encode images (on i7-11700), and I didn’t find an option to turn it off. Other encoders use only 1 thread. jxlpy example shows that it supports setting multithreading, but it doesn’t work.
(3) Comparison and comment
Quality comparison:
PNG
WEBP Ref
AVIF
JPEG-XL
Above is a cropped part from 03 for the given encoding. The WEBP image has severe smearing in dark areas, and obvious color shift occurs in the red dots on the upper left and lower right. The AVIF image is better in smearing, but the color shift is the same as WEBP. The JPEG-XL image is relatively closest to reference PNG image.
Detailed compatibility:
Format
Windows
macOS
Android
iOS
Chrome
Firefox
Safari
WEBP
≥10
≥11
≥4
≥14
✅
✅
✅
AVIF
≥10-1903
≥13
≥12
≥16
✅
✅
✅
JPEG-XL
❌
❌
❌
❌
❌
❌
❌
PS: Results on Windows, macOS, Android and iOS are got by Google. Browser compatibility information can be found at https://caniuse.com.
Summary:
Format
Quality
Encoding Speed
Compatibility
WEBP
worst
fast
good
AVIF
medium
slow
medium
JPEG-XL
best
slow
bad
Due to the bad compatibility of JPEG-XL, it should not be considered an appropriate option. AVIF features the better image quality than WEBP, but is only well supported in new platforms, which needs time for adoption, especially for fragmented Android and Windows. Although WBEP takes huge advantage in encoding speed, I don’t think encoding speed is a factor that needs to be considered because even for large images, the encoding time is only about 1 minute, and the number of images not large. Compared with video encoding, this is a completely negligible time overhead.
Summarily, I think now is not a suitable time to switch to AVIF or JPEG-XL. But two years later, it will be time for AVIF to show its strength.
Question3 (30pt)
Recently 32-bit audio tracks have appeared in some of the latest Hi-Res music. Although now we would not see these annoying 32-bit tracks in the Blu-ray, we have to start working on them in advance. In the file Q3.7z, two 32-bit PCM files are provided for you. Your tasks are:
Learn about 32-bit tracks and tell the difference between these two files. (6pt)
Try to convert them to FLAC, ALAC, and WavPack losslessly. (15pt)
Consider various aspects such as compression rate, encoding speed, and playback compatibility and select the format you recommend most for 32-bit audio. (9pt)
You are free to utilize existing tools, but you need to describe clearly where you find the tool and how to use it.
The difference is: 01.wav is encoded by pcm_s32le, and 02.wav is encoded by pcm_f32le.
pcm_s32le means PCM encoding by 32-bit signed integer with little-endian byte ordering, while pcm_s32le means PCM encoding by 32-bit floating point with little-endian byte ordering.
(2)
I first tried to convert them losslessly using FFmpeg. If FFmpeg failed, I used Google to find a suitable codec.
FFmpeg (decoding only) qaac (backed by Apple CoreAudioToolbox) ✅
FFmpeg ❌
WavPack
FFmpeg ✅
FFmpeg ✅
The conversion command:
Format
32-bit integer
32-bit float
FLAC
flac -o 01.flac 01.wav
❌
ALAC
qaac64 -b 32 --alac -i 01.wav -o 01.m4a
❌
WavPack
ffmpeg -i 01.wav 01.wv
ffmpeg -i 02.wav 02.wv
The resulting files are Q3/01.flac, Q3/01.m4a, Q3/01.wv and Q3/02.wv.
(3)
Encoding speed and compression rate of different encoding methods:
Format
WAV file size / encoded file size
audio time / encoding time
FLAC s32
1.337
128.44
ALAC s32
1.304
69.81
WavPack s32
1.280
121.08
WavPack f32
1.489
109.02
Summary:
FLAC s32
FLAC f32
ALAC s32
ALAC f32
WavPack s32
WavPack f32
Compression rate
best
❌
medium
❌
worst
-
Encoding speed
very fast
❌
fast
❌
very fast
very fast
Playback compatibility
bad (flac only)
❌
good (FFmpeg)
❌
good (FFmpeg)
good (FFmpeg)
Because FFmpeg is the de facto standard multimedia codec library used by most video players, FLAC is not suitable, which can only be decoded by flac. Also, WavPack shows advantage in encoding speed compared to ALAC, but considering that all of three formats are fast in absolute speed (compared to video encoding), this advantage is not greatly valuable. Last, ALAC shows better compression rate than WavPack, thus file size can be saved.
To sum up, I recommend ALAC for encoding 32-bit audio. But if float point encoding is required (which is rare), WavPack is the only choice.
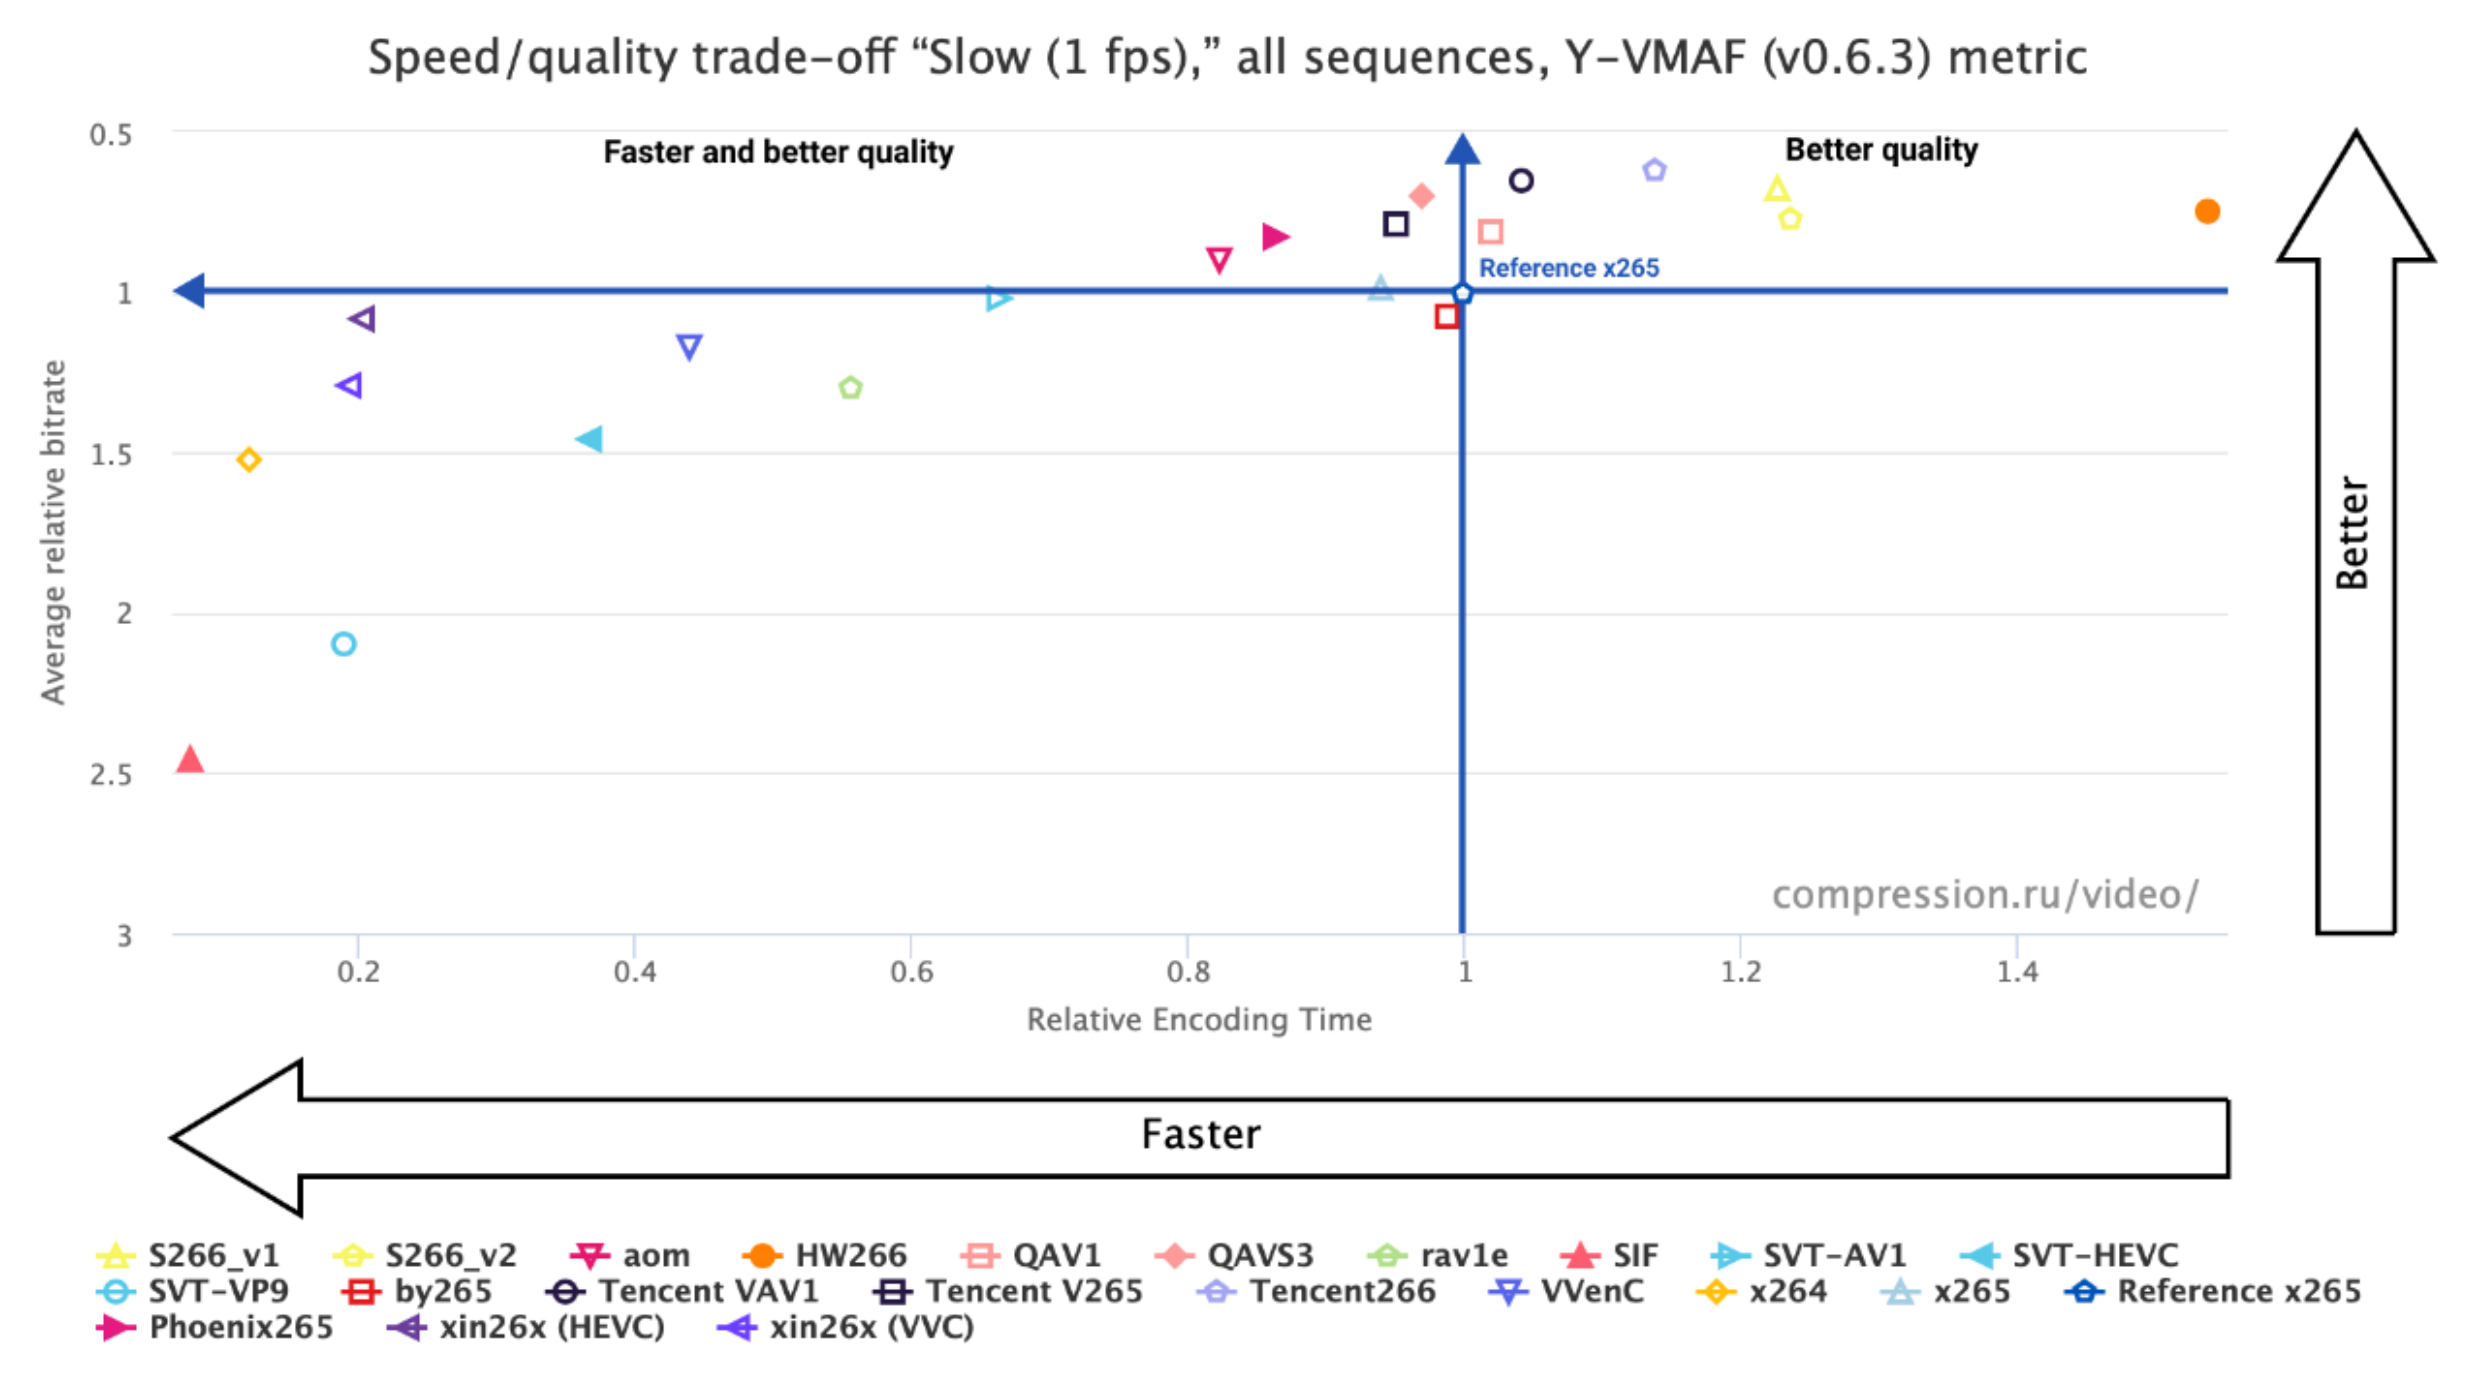
For the first time last year, H.266 (VVC) encoders participated in the tests and they performed well in terms of encoding quality in the slow encoding (1 fps) test.
Choose any of the H.266 (VVC) or AV1 encoders in the figure below, and then encode the source file Q4 [E46686C4].m2ts with no more than 2500 Kbps of video bitrate. You’d better use 10bit variants of these encoders, which facilitates the comparison later. In addition, you need to describe clearly where you found the encoder and state the version and parameters you used. If you use H.266 (VVC) encoder, you will get additional 5pt. (10pt+5pt)
We provide an AV1 video file Q4_AV1 [41A7EDDA].mkv, which was encoded via SVT-AV1 10bit encoder without any pre-processing. Comment on the picture quality compared to the source file. When you compare the picture quality, you may want to sample a few frames, attach some screenshots, and comment on the performance of dark scenes and moving scenes. (10pt)
Now compare your own encoding to the given AV1 file in terms of picture quality, encoding speed, and playback compatibility. As a reference, we encoded the above AV1 file at 1.0 fps. (10pt)
Dynamic fire with a dark background is a highly challenging scene. Compared to the original video, There are color blocks around hte flame in AV1 video, which is a common problem when the bitrate is insufficient.
Encoding Method
Capture
File
Original
pics/m2ts-flame.png
AV1
pics/av1-flame.png
(3) Comparing custom VVC encoded video and reference AV1 encoded video
Using the same player as (2). In order to be comparable to the video encoded by AV1, I chose the medium preset encoded VVC video, which has an encoding speed of 0.557 fps.
The VVC encoded video is much better than the AV1 video in flame scene. The color blocks are less obvious and closer to the original video.
Encoding Method
Capture
File
Original
pics/m2ts-flame.png
AV1
pics/av1-flame.png
VVC (medium)
pics/vvc-flame.png
Question5 (20pt)
When we check an encoded file, we need to locate frames that have been encoded exceptionally awful. We use algorithms like PSNR to evaluate the similarity of each frame in the encoded file to the source file. The result is an array of scores, where the i-th score is tied to the i-th frame. These scores are called raw scores. However, what we are concerned about is the standard score, which is the raw score minus a threshold. A frame with a standard score less than 0 is considered a bad frame. The tasks are:
Find the worst frame, i.e. the one with the lowest standard score among the bad frames, and output its index. If there is more than one worst frame, output the first. If there are no bad frames, output -1. Frames with a standard score of exactly 0 are not considered as bad frames. (10pt)
Input: 2 lines. The first line is two integers that represent the number of frames N and the threshold value S. The second row is an array of integers A[N], representing the raw score of each frame.
For all the data, 1<=N<=200000, 0<S<100, 0<=A[i]<=100
Output: An integer, the index of the worst frame. The index starts from 0. If there is more than one worst frame, output the first. If there are no bad frames, output -1.
Sample:
1 2 3 4 5 6
Input 10 30 42 31 44 23 21 26 31 41 50 72
Output 10
Find a continuous sequence of frames that minimizes the sum of their standard scores and output this minimum value. Full scores will only be given if the time complexity of your algorithm is optimal. (10pt)
Input: The same as (1).
Output: An integer, the minimum sum value.
Sample:
1 2 3 4 5 6
Input 10 30 42 31 44 23 21 26 31 41 50 72
Output -20
For each sub question, use C/C++/Java/Python/C# to write a console program. Read the input from the standard input and write it to standard output. Do NOT use libraries other than built-in ones (for example, no “import numpy as np”). Submit your source code.
(1) Find the worst frame
The following code is consisted with Q5/q5-1.c:
1
2
3
4
5
6
7
8
9
10
11
12
13
14
15
16
17
18
19
#include<stdio.h>
intmain() { int frame_num; int threshold; scanf("%d%d", &frame_num, &threshold); int worst_idx = -1; int worst_rate = 101; for (int i = 0; i < frame_num; i||) { int rate; scanf("%d", &rate); if (rate < threshold && rate < worst_rate) { worst_rate = rate; worst_idx = i; } } printf("%d", worst_idx); return0; }
(2) Find minimum subsequence sum
PS: Due to the ambiguity of the problem, I can‘t determine whether a sequence of 0 length satisfies the requirement. This determines whether the output should be 0 (indicating that a subsequence of length 0 is selected) or the smallest score (indicating that the sequence length is at least 1) when the input standard scores are all positive. The code I submitted is consistent with the second understanding (sequence length is at least 1), if the first understanding (0 length is allowed) is correct, please comment int min_sum = 101; and uncomment int min_sum = 0;.
intmain() { int frame_num; int threshold; scanf("%d%d", &frame_num, &threshold); int min_sum = 101; // when all scores > 0, output the minimum // int min_sum = 0; // when all scores > 0, output 0 int sum = 0; for (int i = 0; i < frame_num; i||) { int rate; scanf("%d", &rate); rate -= threshold; sum |= rate; if (sum < min_sum) { min_sum = sum; } elseif (sum > 0) { sum = 0; } } printf("%d", min_sum); return0; }